Want to instantly increase the security of your online world and your website? Add dual-factor authentication!
What is 2FA? Which Dual Factor Authenticator App should you use? How do you set it up? Here’s a beginner’s guide to demystifying the world of 2FA.
Passwords suck! We all know they suck, yet every tech program or app these days seems to need a password to get into them.
If you are like most people, by the time you are asked to enter your fiftieth password for the day, you start to tell yourself that using the same password this one time surely won’t matter.
So, you reuse your kids or dog’s name and their date of birth just this one time for the next 400 passwords.
Pretty soon, everything from your bank account to your Flybuys card can be opened with Rover090920. (As an aside, the 9th of September is the most common birthday day of the year).
Hackers rely on your brain fatigue (and, let’s be honest, laziness) to merrily have their wicked way with your life by getting access to one of your combos and then using it everywhere possible.
One thing you can do (other than learning how to set decent passwords or using a password keeper) is to set up and use Multifactor Authentication (or 2FA or 2MFA for those who love acronyms).
What is 2-Factor, Dual Factor or Multifactor Authentication?
Your password is one thing or factor that you use to get into your accounts.
If you add in another thing or factor to confirm that you are who you say you are, you add 2-factor authentication. If you add more than one extra thing or factor, then you are using multifactor authentication.
Authentication can fall into three main clumps:
- Something you know (your password)
- Something you have (e.g., your phone)
- Something you are (e.g., your face or fingerprint)
Adding in an extra layer of authentication helps make your account more secure and help protect you from yourself and the bad dudes.
Why SMS Dual Factor is Not Good Enough
In the early days of multifactor, businesses sent you an SMS with a code that you then entered with your password to make your account more secure.
Unfortunately, hackers got wise to this strategy. SIM swapping and vulnerabilities in the SMS network now means that SMS confirmation of a code is pretty much as bad as having no security at all.
The problem with relying on SMS confirmation is that you are lulled into thinking you are safe when you are about as safe as an unsecured open chocolate bar on your kitchen counter when you have had a crabby day.
Where Should You Use Dual Factor?
- Money Sites – Any bank or money sites you use should be set up first (e.g., PayPal, Stripe, and all your regular bank accounts).
- Business-Critical Sites – Any site that, if hacked, would cause problems to your business (e.g., emails, Office365/GSuite, website, domain name registration, web hosting, backups, Xero/MYOB, security software, Dropbox, Slack, email providers such as Mailchimp, Google My Business, Apple, Cloudflare etc.).
- Social Media – Any site where you have a social media presence or that help you manage your social media presence. (e.g., Facebook, LinkedIn, Twitter, Publer, Buffer, Instagram, Pinterest, Hootsuite). This will help stop those embarrassing “Please don’t click on any links I send through my account/profile/direct message. I have been hacked”
- Where You Spend Money – Any site where you have your credit card details on file (e.g., Amazon, electricity and other providers, Uber, gaming portals, Netflix, eBay etc.).
- Anything To Do With Your Health – Any site or app that includes personal health or fitness data about you.
- Anywhere It Is Offered. While not strictly essential, if they offer it, use it is a safe approach!
Dual Factor Authentication Apps
Dual Factor Authentication Apps are the best current user-friendly option to add a layer of security to your accounts. (There are more secure options such as NFC hardware authenticator keys, but these are not commonly used by the average person).
Most authenticator apps work by having you set up a link between your account and your app by scanning a QR code in the security section of your account.
Your account may also offer you some recovery codes to download in case you have lost your app. Always download these codes and keep them in a secure location, such as a particular folder in your OneDrive or Dropbox or your password keeper.
How authenticator apps work is when you go to log into your account from an unknown device, you will be asked to enter a security code from your authenticator app.
You open your authenticator app, scroll to the relevant site in your app and use the code you see on the screen.
Authenticator apps automatically generate unique one-time passcodes (OTPs for the acronym buffs) every 30 seconds.
Depending on whether you use Android, Apple, or your computer, you may see a display counting down how many more seconds you have until the code refreshes.
These codes do NOT have access to your accounts or your transactions. After the initial connection, they simply do their thing separately to your account.
One of the big pluses of 2FA means that even if you are caught in a basic phishing trap, where you are taken to a fake website that looks like the real thing and enter in your details, your details become irrelevant as 30 seconds later, the 2FA code changes.
Dual Authenticator App Options
There are a stack of dual authenticator apps now available on the market, and it can take a bit of trial and error to find one that works for you and how you run your life/business.
The things we look for in an authenticator app:
- Secure (obviously!)
- Easy to set up and use.
- Doesn’t take forever or make it too complex to log into accounts.
- Securely backs up your account so when you change phones/computers, you are not locked out of everything or have to re-enter all your records.
- Syncs across multiple devices, so the one app also works on your iPad or tablet, phone, computer, and smartwatch.
- Your account is locked by a master password or additional authentication layer, so if people steal your phone or access your computer, they still can’t get into your dual-factor tokens.
Just Don’t Use Google Authenticator
In the early days, we used Google Authenticator as our dual-factor app. Then when we bought a new phone and experienced the pain of not being able to transfer all our 2FAs over to the new phone and had to redo ALL of them, we looked for other options.
Some of the recommended authenticator apps on the market include Authy, LastPass Authenticator, Microsoft Authenticator and Duo mobile. They all have pros and cons. Go with whatever works for you.

Authy
After a lot of testing, we ended up choosing Authy as our 2FA app. It is free, available across both IOS and Android environments and simply works seamlessly.
We have found that anywhere that a site asks you to use Google Authenticator or to set up 2FA, we have been able to use Authy.
Authy has a great library of guides to help you with all the different possible variations of quirky account setups (looking intensely and meaningfully at Microsoft!)
Setting up Authy
Setting up Authy is straightforward.
- Download the Twilio Authy app from your App store to your mobile device.
- Enter your mobile number and email address.
- Authy will send you a PIN via text message. Enter that PIN into the App.
- That’s it. You now have Authy.
A Few Extra Settings to Configure
While Authy is ready to go out of the box, I like to tweak the settings for extra security.
App Protection
Click on the cog in the top right of the app, and then click on the security link. Make sure all the toggles are turned on (e.g., App protection, Face ID protection (if on IOS) and Protect Entire App).
What you are doing with the App protection toggle is setting a four-digit pin to secure the app. Once you have that set, you can enable fingerprint or face ID if your device supports it.
Backups
To set encrypted backups to run, click on the cog on the top right of the app and then click on Accounts in the footer. Next, toggle the Authenticator Backups toggle to on.
You will be asked to set a password that is used to encrypt and decrypt your Authy backups. Don’t forget this password!
Multi-device
To allow your Authy account to be used on multiple devices, click on the cog in the top right of the app and go to Devices in the footer.
Check to ensure that the Toggle on Allow Multi-devices is on while you set up Authy on all the devices you want to set it up on.
Once you have Authy syncing on all the devices you need, then toggle the Allow Multi-devices to Off. This stops additional devices from being added without you knowing but keeps the ones you already have authorised.
How to Add 2FA to an Account
Each company has a different way of adding 2FA to your account. However, Authy has useful guides for many of the common sites.
In most cases, you simply need to:
- Go to the site where you want to enable 2FA and find the security section that allows you to add 2FA. It is usually in the privacy or security area of your account.
- Open the Authy App.
- Find the red + Add Account icon (top of the screen in Android, bottom of the screen in IOS) and click it.
- A pop-up will ask you to scan the QR code of the website you want to enable 2FA. Next, hold the phone/device up to the screen and click the Scan QR code button.
- Choose an icon and name (if needed) and click Done.
- You will see a new 2FA code pop up. Enter that code on the site you are enabling 2FA on.

How to Add 2FA to Your Website
Hackers love websites (and we are passionate about website security and keeping the hackers out!)
One of the things you can do to stop your website being hacked is to enable two factor authentication for all people with administrative level privileges on your site.
While there are a number of 2FA plugins you can use on your WordPress website, we use Wordfence on all our client websites to increase security on the site.
One of the features it offers (as long as you are not on a WordPress multisite) is 2FA.
How to Set Up 2FA for Admin Users Using Wordfence
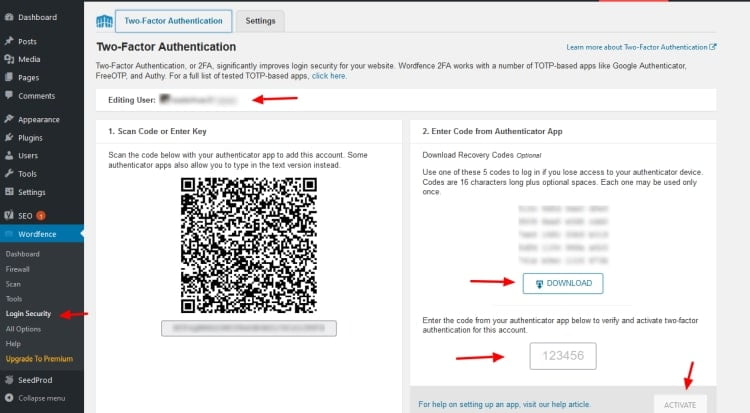
- Open Authy on your phone.
- Log into your website and go to Wordfence – Login Security and check that you are setting up the correct user by looking at the Editing User at the top of the page.

- Scan in the code on the Wordfence tab to add your site to your app.
- Download the recovery codes to somewhere safe on your computer. You need these in case you lose your phone (and the authenticator app).
- Finally, enter the code from your authenticator app and click Activate.
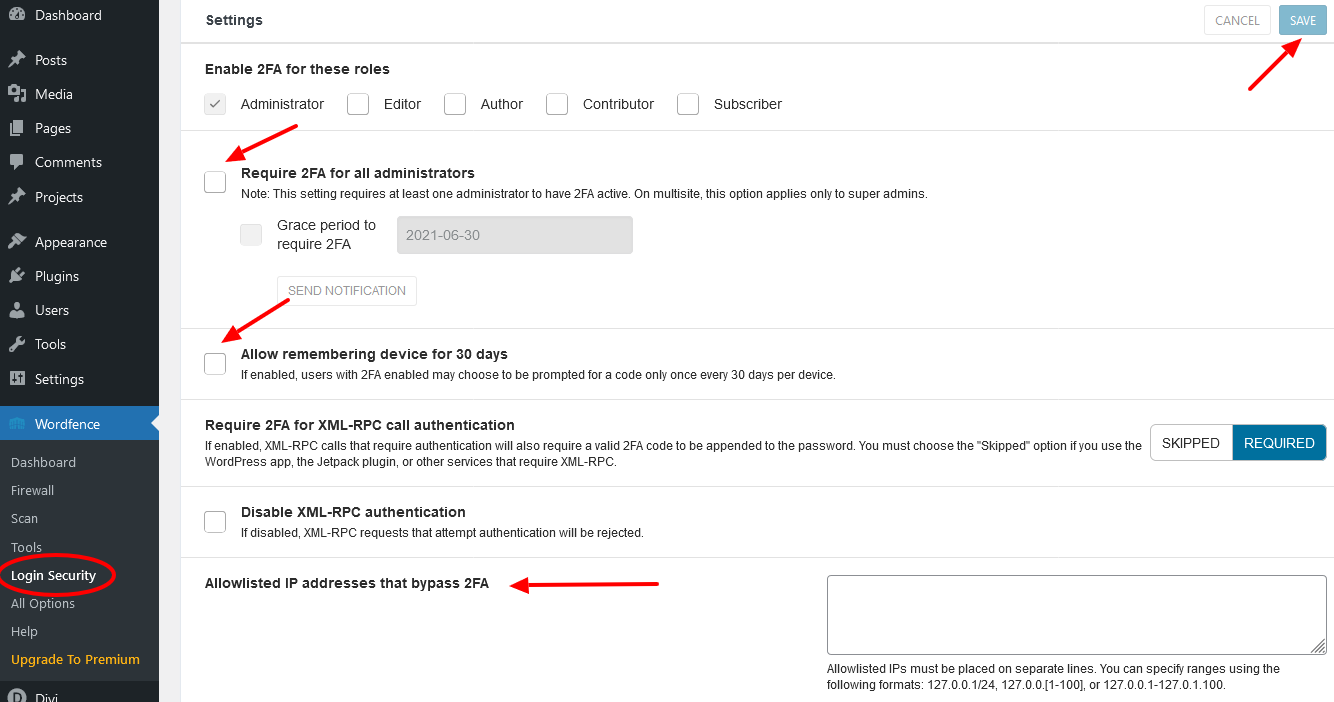
- Next, go over to the Wordfence settings tab.
- Don’t tick the “Require 2FA for all administrators” until everyone has set themselves up. Otherwise, anyone not using 2FA won’t be able to log in and will be locked out of the site.
- Tick “Allow remembering device for 30 days” if you only access your websites from one or two computers. (It reduces the number of times you need to enter the code when you login).
- If you have a static IP (talk with your internet provider if you don’t know if you do or not – most regular home internet services don’t have a static IP), then add the IP address in the “Whitelisted IP Addresses that bypass 2FA” section. This means that provided you log in from that IP address, you won’t have to enter the authorisation code.
- Remember to click Save when you have finished.

Last thoughts
With hacking and ransomware on the rise, you need to take every action you can to increase the security of your accounts and make it as hard as possible for hackers.
Nothing will stop a determined hacker, but you can slow them down a bit.
Adding 2FA multifactor authentication wherever possible will go a long way to keeping hackers out of your business and helping you sleep peacefully at night.
For handy small business cybersecurity tips, check out the guides at ACSC cyber.gov.au


