Do the maps on your website show “This Page Can’t Load Google Maps Correctly” Error? Here’s what it is, why it happens and how you can fix it.
If you have had your website for a few years, you tend not to pop in and visit it all that often.
It’s a bit like a distant relative. You know that they’re there, and hope that everything is fine, but unless they make the front page of the local paper for breaking out of a nursing home to run away and become a groupie with Justin Bieber, you don’t think much else about it.
However, ignoring your website does have a downside when technology changes and something breaks on your site.
If you haven’t visited your website in recent memory, you won’t know if something has broken, so your website will gleefully show error messages to your potential clients – day in, day out, for months at a time.
Broken code and errors on your website are like massive pus-filled pimples on the side of someone’s face. You can’t help but stare at them. They are not attractive and will cost you clients.
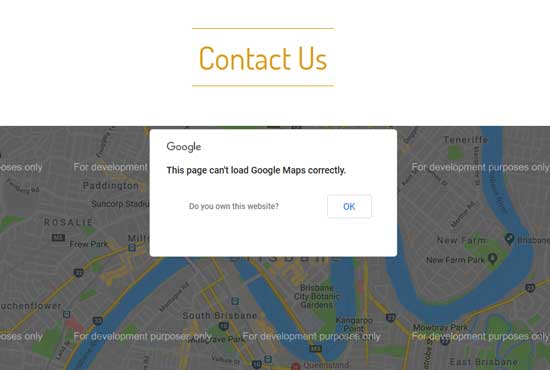
A common problem we see on older sites is the “This Page Can’t Load Google Maps Correctly” error when you visit a page on the website that is supposed to show a map of the business’s location.
I recently checked out all of the small business websites of our local Chamber of Commerce and found that one in five websites that had maps on their site, all had this error (including one of the other local web designers).
And this is where you duck away for a moment to check on your website.
I can wait (… hums chorus of The Girl from Ipanema).
How did you go? All good? Is your map still showing without any problems? Congratulations, and see you next week.
Not so great? Let’s take a look at what is causing the problem and how to fix it.
A quick bit of Google Maps history
Adding maps to websites is a useful way to show clients where you are located, and how they can get to your business.
In the early days of web design, we simply scraped a bit of code off Google Maps, and shoved it into your website and allowed Google to work their magic.
Then on 22 June 2016, Google changed, and required API keys to be set up and used on all new websites who wanted to display a map powered by Google. All sites built before that were grandfathered, which meant the old code still worked.
Until this year.
Google Maps Rules
On 11 June 2018, Google changed the rules for the Google Maps Platform.
You now need both an API key as well as a Google Cloud Platform billing account: no matter if you are a new site or an older one. No more grandfathering!
Google Maps is now a user pays model. If you want to use Google Maps on your website, you have to pay for it.
Key things to know about Google Maps:
- Each website map is called a project.
- Every Google Maps project MUST have a billing account linked to it.
- Pricing is based on the number of times the map is loaded on your page.
- Everyone gets $200US credit on their billing account each month to help offset map views. This covers approximately 28,000 map views a month, which is enough for most small businesses.
- If you don’t have a valid API key for your map, the map is displayed in low resolution and watermarked with “for development purposes only”.
- You can also get an error if your credit card has expired or is otherwise invalid, or if you have exceeded the number of page views you self-imposed when you set up your account.
What causes the This Page Can’t Load Google Maps Correctly error?
If your Google map shows “This page Can’t Load Google Maps Correctly” error, you either
- a) haven’t set up a Google Maps API key and correctly included the key in your website,
- b) haven’t properly set up billing in the Google Cloud Platform.
To fix the problems, you need to get your Google Maps API key and set up billing before embedding your new API key into your website.
Unfortunately, Google makes this process intensely complex. Even I ended up yelling at my computer monitor more than once when doing my first website map set up under the new regime. (We all know that yelling at your computer makes code magically fall into place and instantly work … in a parallel universe!)
How To Get a Google Maps API Key
You need to jump through a number of steps to set up a Google API Key.
Here are the instructions from Google on setting and restricting a Google API Key.
Here is my take on the instructions. Be warned; it does get a bit technical.
- Log into your Google account using your favourite browser.
- Go to https://cloud.google.com/maps-platform/
- Click the Get Started button at the top right.
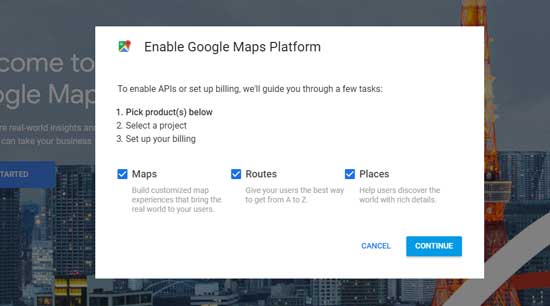
- Select all three boxes: Maps, Routes, Places. Then click continue.
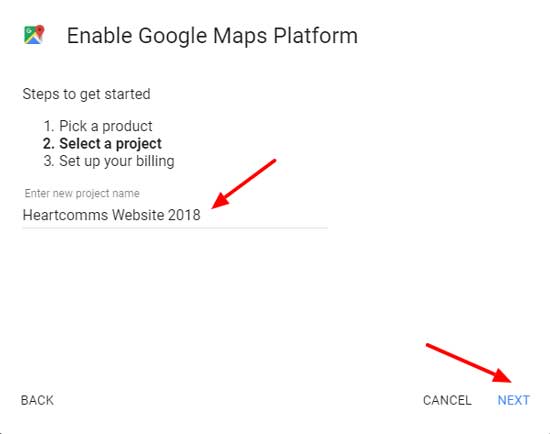
- Click on the greyed out text that says, “Select or Create a Project.”
- Type in the name of your project. I usually use the name of the website plus a short descriptor (e.g. Heartcomms Maps 2018)
- Set up your billing account. Here’s one of Google’s instruction videos to help explain what you need to do to set up an account. There are four in the series to sit through (bring alcohol and snacks!).
- If you have set up your billing account correctly, you will be taken to a screen with your API Key. Copy it and paste it into a document for later. But, before you click on the done button, click on the blue API Console link.
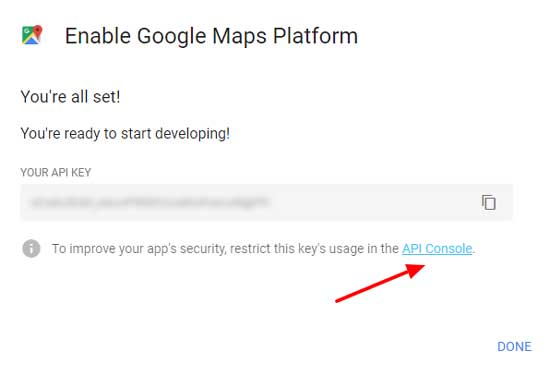
- You need to restrict your key only to your website to stop other people hijacking your credit.
- Change the name to something to help you identify what it is. I use the Website name plus Maps API plus the month and year.
- Tick the https referrers box
- A new section will pop up. This is where you tell Google only to accept map requests from your site only.
- Be very careful how you type this in to make sure you get all the variations of http and https, plus all the sub-pages. The pattern I use is: *.websitename.com.au/*
- Click save

- Now go back to your API screen and make sure you have your API key copied in a safe place, then click done.
- Finally, add the API key to your WordPress website or the maps plugin you are using.
Where you add your code varies from theme to theme and plugin to plugin. In my beloved Divi theme, you can find it in the Theme Options tab.

- Clear your website cache and wait a few minutes (it can take up to 15 minutes for Google to catch up with the changes). If you have set everything up correctly, your map should no longer throw the error.
If you still have an error or have a new error with your map, go back and check you have set everything up correctly. It may take a few goes to get it right. Read more about Google Maps error messages.
Other Map Options
If all of this seems too hard, you have a few other options.
- Get rid of the map altogether. In many cases, this is the easiest option.
- Go for a screenshot image of a map. Useful if you want to show where you are located, but not helpful for driving directions for your clients.
- Check out some Google alternatives including Bing Maps, MapQuest, OpenStreetMap. However, most still have some form of API hoop to jump through.
- If you use Divi, check out this brilliant Google Maps workaround by Nelson from Peeaye Creative.
Last thoughts
Setting up Google Maps is one of the most confusing parts of existing in the Google universe.
The “helpful” instructions by Google seem only to be designed for higher-end web designers and developers, or people who can translate geek-speak into meaningful English, so don’t beat yourself up if you struggle with them.
If you are having problems with your maps on your website, check with your web designer or drop me a line and we can help sort it out for you.