Looking for simple, high-quality graphic design for your small business, without the expensive price tag? Here’s how to get your creative juices flowing with Canva so you can DIY!
Mention the words “graphic design” to many small business owners and you will often see them wince or run away screaming. They may have tried to DIY designs and failed dismally after forking out hundreds of dollars per year on premium products like Photoshop. They end up paying professional designers every time they need to create even the smallest day-to-day images for them.
What if we told you there was a way to design your own images and graphics that is easy, user friendly, best of all it’s free?
This week’s Beginner’s Guide is a program called Canva: a freemium online graphic design program that we use for almost everything.
What Is Canva?
Canva is arguably the simplest to use graphic design program on the market. With origins stemming from a yearbook program designed for use in schools in Australia, Canva has been helping both professionals and amateurs alike create amazing graphics for business and personal use.
Using a simple drag and drop interface, it’s easy for people of all ages and skill levels to create professional looking designs quickly and with very little stress. You can even turn your designs into print by ordering straight from the program.
Canva is available as an online cloud-based program as well as an app available both in the App Store and the Google Play store. This means you can create and edit designs anywhere you have an internet connection.
What makes Canva unique is that it is super easy to use even for graphic novices, and it includes loads of tutorials and templates to get you started. If you want to go deeper, you can take some of their free online graphic design courses through their program Canva Learn.
 When NOT To Use Canva
Canva is addictive, and you can easily believe that you don’t need to hire a graphic designer ever again. This is definitely not the case!
A professional graphic designer has an eye for colour, detail and design that the best program can’t match. If you will be doing a major print run, getting business cards done up, sorting out a new logo or branding, getting a new website or creating something that you will be handing out for months and not hours, then invest in professional graphic design. This is not DIY territory!
Pricing
Like most of the programs in the Beginner’s guide to series, Canva is a freemium program which means that there are both free and paid versions of the program.
However, Canva varies from other freemium programs in that they don’t limit access to the various features that are part of the program if you have a free account.
The free version is perfect for casual users and single small businesses where there is only one set of branding. For more advanced or heavy users of Canva, or those who have more than one set of business brandings, there’s the paid alternative Canva for Work.
Canva for Work offers more variety in the choice of free to use images with a catalogue of stock photos, graphics and even illustrations that are available exclusively to paying members.
It also gives you the ability to better organise your designs and brandings with folders and allow you to upload different fonts rather than be limited to their font library.
One of the best paid features is one click resize. Once you create a design in a certain size (e.g. Facebook), you can one click and it will resize automagically for Twitter/Instagram etc. It makes creating different sized designs a breeze!
The paid version of Canva only costs $12.95 per user per account per month (with the ability to have up to 30 team members per account) and is a must-have for any business who don’t want to pay for pricey premium products such as the Adobe Creative Cloud.
We use Canva for Work in our business, and find we use it multiple times each day. We could not run our business without it!
How To Set Up A Canva Account
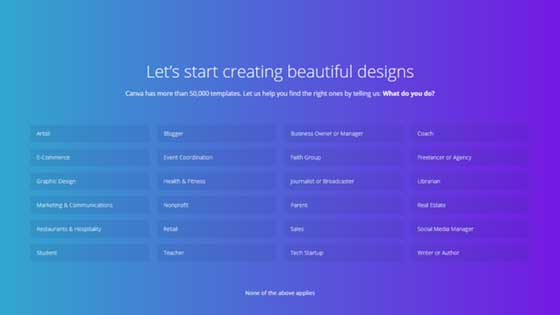
Setting up a Canva account is a simple process. Start off by navigating to the Canva homepage and selecting your reason for using Canva from the list (education, small business, large company, non-profit or charity, personal).
Then sign into Canva by either using your Google account login or by inputting your email and choosing a password. If you picked personal in the reason for using, you also have the option of signing up by linking your Facebook account.
To finish off the account creation process complete the survey to help tailor your account to your needs. Once that is completed you will be taken to a tutorial where you will be walked through the basics of using Canva.
How Do Businesses Use Canva?
Canva is perfect for businesses of all sizes who want to do their own graphic design, or who don’t have the budget to hire a professional to do graphics for their day to day needs such as Facebook posts, flyers for networking events, eBook covers and books for downloads, PowerPoint presentations, marketing postcards and blog images.
Canva lets you take control over your designs and social media, giving you the ability to whip up something amazing whenever you need it.
Useful Canva Features
Canva is a beginner graphic designer’s dream with tons of different features available to help you get creative. Here are some of the key design elements that you should know about when getting started.
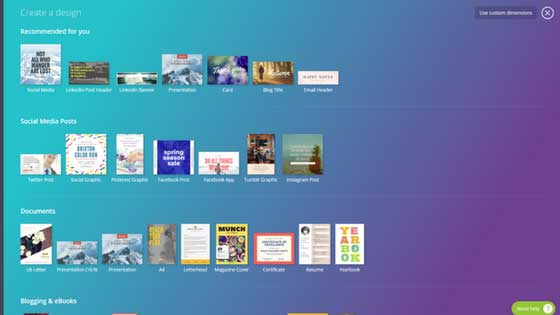
Templates
If you are not sure where to start with a design Canva has over 50,000 templates available for use. You can choose from a professionally designed template, and then adjust the colours, fonts and images to match your brand.
Whether you need a basic social media post or even something complicated like book covers, recipe cards, bookmarks gift certificates, resumes or tickets, Canva has a template to help. Each template is already perfectly sized ready for the social media or document you are preparing.
Images
A picture is worth a thousand words when it comes to marketing. In Canva there are two different ways to use images: Upload your own or search and use a stock image from their extensive library. Be aware that many stock images in their library are pay to use.
Canva for Work users gain access to a large assortment of images that are exclusive to paying users.
You can also apply filters to change the look of your image & crop your images to fit your design.
Frames
If you want a pretty border around your image, you can put it in a frame like a picture frame. You can move your image in the frame to position it in the best way.
Shapes
In Canva, shapes are a collection of classic shapes which can be used as building blocks in designs. There are loads of options here. Use the shapes as they are with text in front of them, as a semi-transparent wash behind a title, and as a design feature in their own right.
Lines
Sometimes your designs just need a simple or fancy line to make them look amazing. As part of Canva’s built-in graphics library, there are loads of fancy lines and squiggles for you to play with.
Illustrations and Icons
Canva’s illustrations are simple, cartoon style images that make it simple to add some whimsy to your graphics. They are great to add funny hats, props, etc. to photos.
Icons are similar to illustrations but have more of a business flavour to them. They are great for adding social media icons to a design.
Three Ways To Create A Design Using Canva
Option 1: Start from a blank slate with a plain coloured or patterned background
- Choose your size – Choose the size of your design based on where it will be used.
- Choose a background colour – Use one of the pre-selected colour options or use your brand colours. To add a brand colour, click on the + and add your colour code. (Use ColourZilla to pick your colour number if you don’t know what it is!)
- Add a background pattern – There are a host of plain and patterned options. Start by choosing the free options to get started. You can change the colour of the pattern by clicking on the colour tab at the top.
- Made a mistake? If you don’t like something in your design, you can put it in the bin or click on the undo button (up the top of the page)
Option 2: Start from a blank slate with a photo background
- Choose your size – Choose the size of your design based on where it will be used.
- Choose a Grid (If you want photos) – Click on the elements tab, then select Grids. Drag and drop the grid want to the blank design. In most cases you want a single grid to cover the whole design.
- Choose an image – Now you need to add in the image you want. You can either search for a photo from the stock library or upload the images you want to add.
- Adjust the image – Tweak your image if needed through filtering, cropping, flipping or changing the spacing.
- Add your text – Click on the text tab. There are 3 different pre-styled plain text options as well as a number of prettier options to add. Type in what you want your text to say.
- Adjust your text – You can change the font, the size, and the colour of any text you add. The drop-down arrow lets you change bold/italic on some fonts, upper-case, lists, position, text spacing, transparency, and a few other options. The pretty options are more limited in terms of what you can change.Move the text to wherever you want it in your design.
Option 3: Edit an existing template (Perfect if your design skills are not great)
- Choose your size – Choose the size of your design based on where it will be used.
- Choose your template – Choose your template if you want a pre-styled background. Drag and drop the layout you want to the blank design.
- Choose an image – Now you need to change the image to one that you want. You can either search for a photo from the stock library or upload the images you want to add.
- Adjust the image – Tweak your image if needed through filtering, cropping, flipping or changing the spacing.
- Adjust your text – You can change the font, the size, and the colour of any text in the template. The drop-down arrow lets you change bold/italic on some fonts, upper-case, lists, position, text spacing, transparency, and a few other options. The pretty options are more limited in terms of what you can change.Move the text to wherever you want it in your design.
Canva User Tips
 Use Layers
Canva builds your images up in layers. You can shuffle a layer forward or backward so the images show the way you want them to.
Add Your Branding
The last step in the design creation process is to always brand your image with your URL or logo to make it recognisable and traceable back to you should your graphic be shared.
Your logo ideally needs to be in .png format with a transparent background so any other images or design elements can be seen through your logo.
Name Your Designs
You can change the design’s name by clicking on the default title up near the share button at the top. This name refers to all images in the file so if you use the file for different graphics, then name it to something related to the content, so you know what’s in there (e.g. Facebook cover images 2018).
Downloading Your Designs
Once you are happy with the design, you can download it to your computer.
When you click the Download button in the top menu, there are a number of options. You can choose to download all of the images in your file, or single pages.
You can select the download type – jpg, png, PDF (standard quality), PDF (print quality) and animated gif (paid version only – we have found this to be a bit buggy).
Remember if you are going to use your design on your website, to compress your images first. No-one likes slow to load images!
Sharing Your Designs
Sometimes you want to collaborate or share your designs with your team. The Share feature allows you send links to people via their email address or by sending a link to people (and you can select if they can only view or edit the design).
You can also share your design directly to Facebook or Twitter, or you can choose to make your designs public and embed your designs directly on the web.
Canva Print
Canva has recently introduced a new service called Canva Print, designed as a competitor to online DIY printing services such as Vista Print.
It offers the ability to order professional prints of your designs straight from your Canva file, ensuring that you get your printed designs quickly and easily.
At the moment, the service is available for a variety of different print sizes such as Invitation size, Letterhead, Poster, Flyer, Postcard and Business Card, with the possibility of a larger size range to come.
This is not something we have played with as yet, as we can’t go past our local printer’s skill and knowledge in choosing the right paper stock and ink colours for our brand.
For more information about Canva Print click here.
Conclusion
Canva is probably our most used product in the office. There hasn’t been a day since we discovered it that we haven’t jumped on to create a quick graphic, be it for work or personal usage like making personalised birthday images.
For those who are new to graphic design, old pro’s or even people that just need to do up a quick slideshow for a presentation that looks professional, Canva is the perfect tool to try.