Want to learn how to schedule social media updates for your small business? Here’s a beginner’s guide to fabulous social media tool Buffer.
So, what is Buffer?
If you’ve used any social media for marketing your small business, you would have struggled with how to post things when you are not hovering over your keyboard. Some social media platforms such as Facebook, allow you to forward schedule individual posts, but how do you do it for more than one platform?
Buffer is one of the most popular social media marketing tools on the market. It is a content scheduling program that allows you to forward schedule your social media to be automatically posted (no more hovering or waiting around!).
Since its creation in 2010 Buffer has been helping companies big and small get on top of their social media.
But Buffer doesn’t just schedule posts; it becomes a hub for your social media. With the ability to integrate all your multiple social media and blogging accounts from platforms such as Facebook, Twitter, LinkedIn, WordPress, Pinterest, Instagram and Google Plus, you can create a central area to organise all your social media posting.
Instead of having to open all your different social media accounts when you want to post content to the individual pages, you can do it all in the one place.
How do you set up an account?
Buffer has both free and paid options, so start by setting up a free account to test out the features and options.
There are two main ways to set up an account: You can either use your email address or sign up by using your Facebook, Twitter or LinkedIn accounts.
Once your account is set up, you will be taken to a page to connect your social media accounts into Buffer.
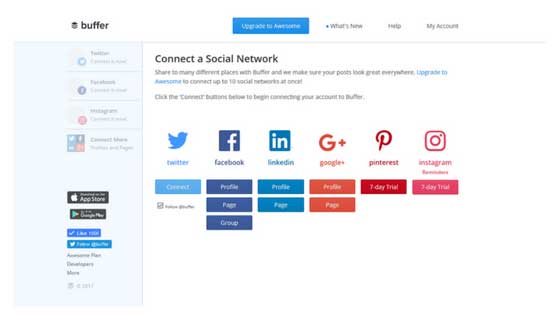
The number of accounts you can connect to your Buffer account depends on your free or paid level. On the free level, you can connect one social account per network.
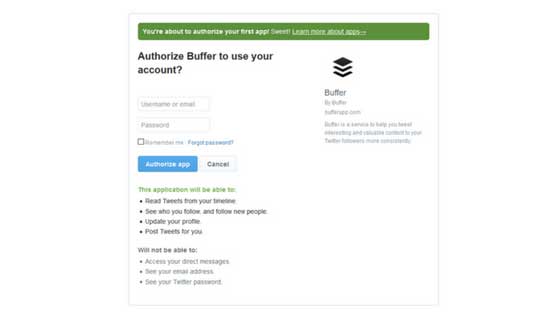
Click on the account you want to add, and then authorise Buffer to use your account.
Once your accounts are linked in Buffer, you have one more step to go before you start scheduling posts.
Settings – Posting Schedule
When you first set up each social media platform in Buffer, you should also set up your default schedule for that platform.
By default, Buffer sets up their recommended best times to post on that platform for you, but you can choose different days and times to work with your schedule and clients.
You can either edit the times they give you or select a new time from their recommendations. You can choose to post every day, weekdays, weekends or on specific days.
Once you have set up your schedule, you are ready to start filling your queue.

What is a Queue?
Each of your social media accounts gets a separate queue to store the posts scheduled to go out.
In a free account, you can schedule up to 10 items in your queue. Paid plans increase that amount to either 100 or 2000 scheduled posts.
Adding Content
Adding in a post is the same as for any social platform. You type in your post and include photos, videos or links to increase engagement with your posts.
You can also download the Buffer extension for your Chrome, Firefox, Safari or Opera browsers, and use it to share great content you find around the web.
There are also Apps available for both IOS and Android if you prefer to share while on the move.
Other ways to find and add more content to your queues are through integrations of Buffer with other tools such as Feedly, Pocket, IFTT, Zapier, Quuu, WordPress, Tumbler, Yammer and YouTube.
You can add in hashtags (Buffer includes hashtag suggestions to make things easier) as well as mention other Facebook pages by simply typing in @and the first few letters of the Facebook Page you would like to mention. Buffer will help you find the right page.
Scheduling Options
Immediate Posting
To post something to go out immediately using a scheduling platform may seem strange, but by posting using Buffer, you get to see the analytics of that post whereas if you post natively on a social platform you don’t.
To send out an immediate post all you need to do is hit the little drop-down arrow in the ‘Add to Queue’ button and select ‘Share Now’ to send your post off straight away.
Add to Queue
The Add to Queue option slots your post into the next available time slot in your schedule. This tool lets you automatically schedule your post into the next available timeslot in your posting schedule without the fuss of having to input the date and time manually.
Custom & Future Scheduling (Paid Versions Only)
Custom scheduling allows you to manually choose the date and time that your post is to go out on your social media accounts.
This allows you to schedule posts up to a year in advance to go out on certain days and times. This is ideal for monthly reminders, celebration days, publicising events as well as sending traffic back to your evergreen blog posts.
There are other options in the paid version including calendar and list views to help plan your posts, so you don’t end up sending out a few updates at the same time.
Analytics
Another important tool is the Analytics function. Analytics is arguably one of the most helpful tools as it assists you to refine what is working and what is not.
When you make a post with Buffer, all the statistics from that post are tracked and analysed. You can then tell how well that post did in term of reach and engagement, what time of day you get the most engagement on posts (which you can then use to optimise your posting times), and which posts are your most popular ones.
The free and Awesome plan give you analytics on a post by post basis. Higher level plans give you more detailed analysis of your social accounts.
Pause Queue
The pause queue feature, as the name suggests, allows you to pause the sharing of your queue with one click.
There have been many cases where there has been a disaster or tragedy in the world, and someone has neglected to check what is next up in the scheduling queue. They then accidentally end up posting something that makes them seem like a complete jerk when it was just a badly timed scheduled post. The pause queue feature lets you avoid that embarrassment with a single click.
Other Features Only Available With Paid Plans
Buffer paid plans offer a multitude of support tools to help you with your social media. Depending on your business you may not need all of them, but here are a few of the top Buffer features.
- Link Shortening – You can choose to link your Buffer account to your Bitly or j.mp accounts. This reduces the clutter of having full links in every post and helps limit your word count when using character limited platforms such as Twitter.
- Google Analytics – You can enable Google Analytics tracking so you can see how many people from your social campaigns end up at your website.
- Team Members – If you have a few people helping with your social media you can give team members access to your Buffer account.
- RSS Feeds – This nifty little tool allows you to input the URL’s of your favourite content sources and blogs into your content inbox. Buffer automatically pulls the most recent ten posts into an aggregated feed, giving you easy access to all the latest content for you to share.
- Rebuffering – By checking your analytics data, you can pinpoint which posts are giving you the best engagement and reach. You can then add them back to your posting schedule to take advantage of their popularity. With many forms of social media, repeating great content still gets great reach and engagement.
- Buffer Reply –
Reply is a high-end tool used to manage customer support requests that come in via social media into one inbox for Facebook, Twitter and Instagram to make it easier for your team to manage.
How much does Buffer cost?
Buffer is a freemium service which means that you can get some features on a free account, but as we have discussed above, there are limits on many of the best features.
The free account, also known as the individual plan is the base level of access that you can get on Buffer. It offers you the ability to link one account of each social media type such as Facebook and LinkedIn to your Buffer account. However, there is a limit of 10 pre-scheduled posts at a time without upgrading plans.
When it comes to paid plans, there are five different tiers to choose from, the Awesome, the Small Business, the Medium Business, the Large Business and the Enterprise.
The plan you pick will depend on a variety of factors including the size of your business, whether you want to allow staff members to schedule content for you to post, and the number of social media accounts you want to link.
The entry-level paid plan is the Awesome plan. For $10 USD a month you get up to 10 social media accounts of a type linked to your Buffer and 100 scheduled posts per account.
The jump from $10 per month to the next level is quite steep, to $99 per month, so it is best suited to larger enterprises and marketing agencies.
One thing to note is that not for profits can get a 50% discount on any plan.
Can your audience see that you are using Buffer?
When you are using a scheduling program, some people feel that you are losing some of the personal connection with your audience you have when you post natively. However, if you are in small business, you don’t have the time to make every post manually.
When you use Buffer, no one will know that it was a scheduled post unless they have an admin account. In the early days of Buffer, your posts used to show “Posted by Buffer”. This has changed, and no one will be the wiser that you used the tool.
Not all social media tools have this luxury, so if discretion is important to you, then Buffer worth checking out.
Myth Busters: “Doesn’t using a 3rd party program limit my reach?”
One of the main questions that get asked when someone starts using a scheduling platform, is will using a 3rd party tool limit your post reach.
The latest word on this came from a reach study by Agora Pulse in August 2017 where they tested reach on a number of different pages using native and third-party tools. According to their data, posts coming from third-party tools had 22.61% BETTER reach than posts shared natively.
Conclusion
It can be a challenge working on your social media strategy. Those who are new to marketing their business on social media can feel overwhelmed at the prospect of having to regularly find or create suitable content for their pages and then post at a time that is right for their client base.
If you would like to test Buffer, click here to visit Buffer’s homepage.